Call or Text us: (929) 605-4397

Category: Uncategorized

  • Anti-Static Foam for Electronics Cases: ESD Classes, Colors, and When You Need It

    Anti-Static Foam for Electronics Cases: ESD Classes, Colors, and When You Need It

    A foam insert can protect a circuit board from a three-foot drop and still destroy it. Physical cushioning and electrostatic protection are two different jobs, and the standard polyethylene or polyurethane foam that handles the first can actively cause the second by holding and discharging static onto whatever it cradles. If your custom insert will carry printed circuit boards, sensors, drives, or any populated electronics, the foam’s electrical behavior belongs on the spec sheet next to its density and cut method.

    When static becomes a case problem

    Static damage is usually discussed as a cleanroom or assembly-line concern, but a case is just a small, dry, friction-rich environment on wheels. Every time a part is slid into or out of a foam pocket, the two surfaces rub and separate, and that is precisely how charge is generated. In a shipping case that crosses climates, the humidity can drop low enough to make ordinary foam a genuine hazard rather than a theoretical one. The question is not whether your case generates static — it does — but whether the foam inside it controls that charge or contributes to it.

    You need ESD-controlled foam whenever the item touching the foam is static-sensitive and unshielded: bare boards, components on trays, disk drives, RF and microwave parts, and most things with exposed pins or connectors. You can usually skip it when the electronics are fully enclosed in a grounded metal chassis, or when the case holds tools, optics, or mechanical parts with no exposed circuitry. When in doubt, treat a bare board as sensitive.

    The three resistance classes

    ESD materials are sorted by how readily they let charge move across their surface, measured as surface resistivity in ohms per square. Under the common ANSI/ESD S541 packaging classification, a conductive material sits below about 1 × 105 ohms per square and bleeds charge away fast. A static dissipative material falls between roughly 1 × 105 and 1 × 1012 ohms per square, letting charge drain in a slower, more controlled way that avoids a sudden spike into the part. An insulative material is at or above about 1 × 1012 ohms per square; it blocks charge movement, which means it also cannot drain a charge that lands on it. Standard packaging foam is insulative, and that is the problem.

    For most electronics cases, dissipative foam is the target. It protects the part two ways at once: it does not itself build a large charge, and if a charged object touches it, it drains that charge gradually rather than dumping it. Conductive foam drains faster still and is common for shorting component leads, but its speed is not always desirable for finished assemblies. The chart below shows where the classes divide and where common foams land on the scale.
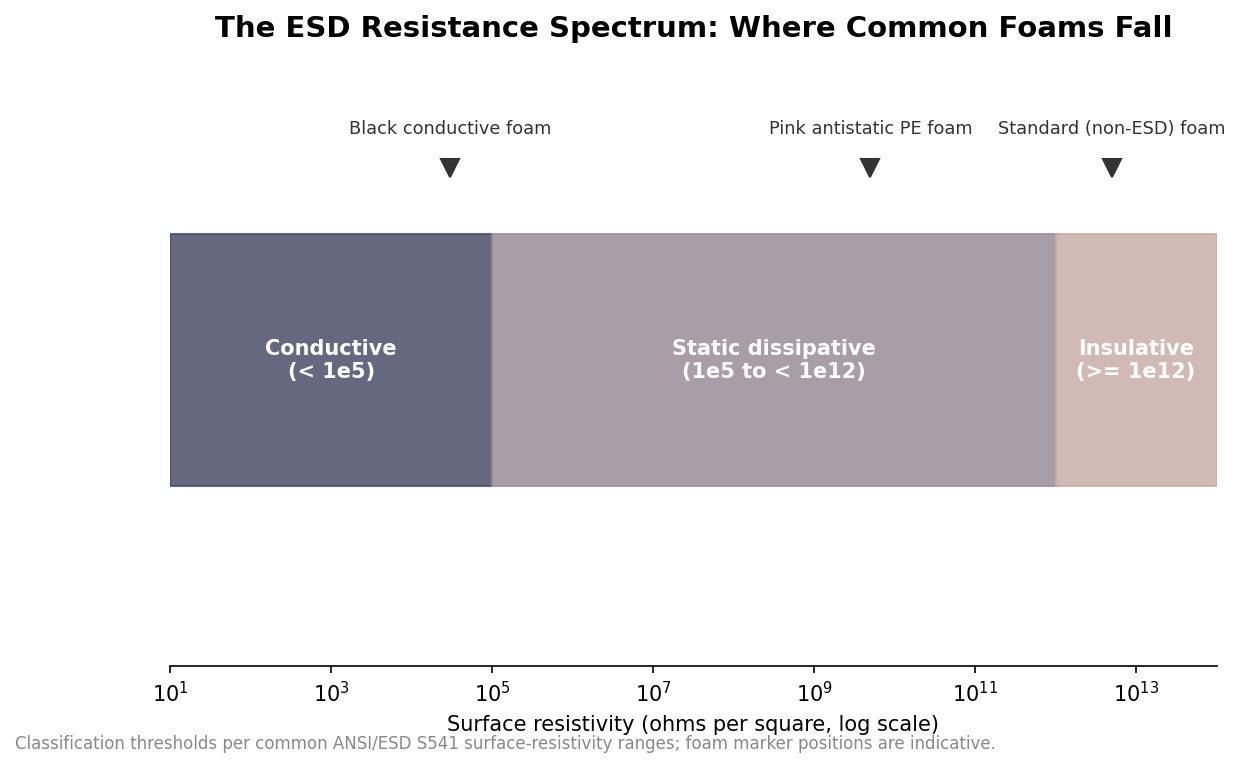
    Log-scale spectrum showing conductive, static dissipative, and insulative surface resistivity ranges with common foams marked
    ESD foam is defined by surface resistivity; standard packaging foam sits in the insulative range.

    “Antistatic” is not a magic word

    The most misused term in this whole discussion is antistatic. Strictly, antistatic describes a material that resists generating a charge in the first place through friction — low tribocharging — which is a different property from where it sits on the resistance scale. The familiar pink foam and pink poly bags are antistatic in that sense: they are treated so they do not readily build a charge, and many also fall in the dissipative range. But “antistatic” on a listing does not guarantee a specific surface resistance, and a pink foam that has aged or been wiped can lose its treatment. If protection matters, specify the resistance class and a target resistivity, not just the word or the color.

    Color is a useful shorthand, not a standard. In common practice black often signals conductive foam, pink signals antistatic or dissipative foam, and plain white or blue foam is usually ordinary insulative material with no static control at all. Those conventions vary by supplier, so treat color as a first clue and confirm the actual electrical spec before you commit a run.

    How much static are we actually talking about?

    The reason this matters is the mismatch between what handling generates and what parts can survive. According to ESD Association fundamentals, simply walking across a carpet can put a person at around 35,000 volts in dry conditions, and picking a poly bag up off a bench can reach 20,000 volts. Raise the humidity and those numbers fall dramatically — carpet drops to about 1,500 volts, a worker at a bench to roughly 100 — but you cannot count on humidity inside a sealed case in winter transit. Meanwhile many components are damaged below 100 volts, and some drive components below 10. The gap between generation and tolerance is enormous, and dissipative foam exists to close it.

    Grouped log-scale bar chart of static voltage generated by everyday actions at low versus high humidity
    Everyday handling generates thousands of volts in dry air, while many parts fail below 100 volts.

    Two things stand out in those figures. First, low humidity is the danger zone, which is exactly the condition a case can create when it moves from a warm truck into a cold, dry warehouse. Second, the damaging threshold sits far below the everyday voltages, so “I didn’t feel a shock” is meaningless — you cannot feel a discharge until it is in the thousands of volts, long after it would have killed a sensitive part.

    Specifying ESD foam for a custom insert

    Put the electrical requirement in writing alongside the mechanical one. Name the class you need — usually static dissipative — and, if your quality process requires it, a target surface-resistivity window and the test method. State the foam type and density separately, since a dissipative additive can be carried in different base foams with different firmness and cut behavior. Ask whether the ESD property is a bulk characteristic of the foam or a surface treatment, because treatments can wear or wipe off over time and repeated use. And remember that ESD foam only does its job as part of a grounded system: the foam controls charge, but the case, the handling, and the people all sit in the same static circuit.

    The practical rule is simple. If the foam will ever touch bare, powered, or unshielded electronics, specify a dissipative or conductive material by its resistance class, not by color or by the word antistatic, and verify it the same way you would verify a critical dimension. The cushioning keeps the part from breaking; the ESD spec keeps it from dying quietly on the bench weeks later.
  • How to Measure Your Case and Spec a Custom Foam Insert That Fits

    How to Measure Your Case and Spec a Custom Foam Insert That Fits

    A custom foam insert lives or dies on measurement. Cut it a few millimeters too tight and the tools will not seat; cut it loose and everything rattles, which defeats the point. The good news is that specifying an insert that drops into your case and holds its contents for years is a repeatable process, not a guess. This walkthrough goes step by step from measuring the empty case to handing a clean drawing to whoever cuts the foam, with the clearances and tolerances that separate a professional fit from a sloppy one.

    Start with the case, not the tools

    Every insert is sized to the case first. Measure the internal dimensions, length, width, and usable depth, at the bottom of the case where the foam actually rests, not at the rim, because molded cases taper and the lip is almost always wider than the floor. Usable depth is the measurement people get wrong most often: measure from the floor to the sealing line, and if the lid has its own ribs or a gasket channel, subtract the space those need so the case still latches. Record everything to the sixteenth of an inch or the millimeter. If you are fitting a known case such as a Pelican or Nanuk, the manufacturer publishes internal dimensions, but confirm with calipers anyway, since tooling and revisions drift. Note too whether anything needs to ride in the lid, because a lid foam layer eats into the closing clearance and has to be planned as part of the same budget rather than added as an afterthought.

    Plan your layers before you plan the cavities

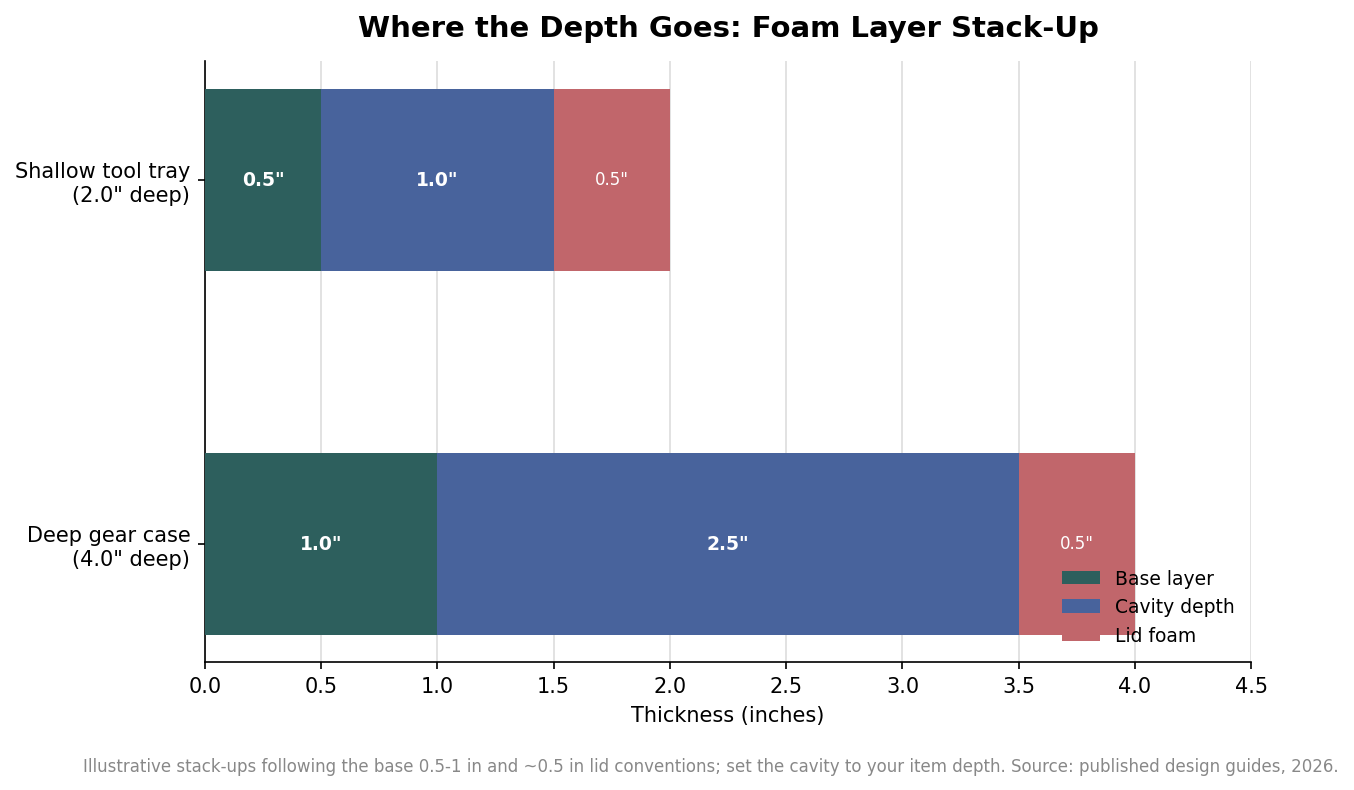
    Most quality inserts are a stack, not a single block, and deciding the stack-up early keeps you from over-cutting. A typical build is a base layer of 0.5 to 1 inch of firm closed-cell foam that stays solid across the whole footprint, a middle layer where the cavities are cut, and often a thin lid or convoluted top layer that presses down on the contents when the case closes. The base does two jobs: it cushions the bottoms of your tools and it leaves foam under every pocket so nothing bottoms out against the hard case. The figure below shows how a shallow tray and a deeper gear case each divide their total depth among those layers.

    Stacked horizontal bar chart showing how a shallow tool tray and a deep gear case split total foam depth into base layer, cavity, and lid
    How total case depth divides among base, cavity, and lid layers for two example cases.

    Working from the stack down means you decide cavity depth by subtracting the base and lid from the usable depth, rather than discovering at the end that your pockets are cut through to the plastic.

    Set clearances and wall thickness so the foam survives

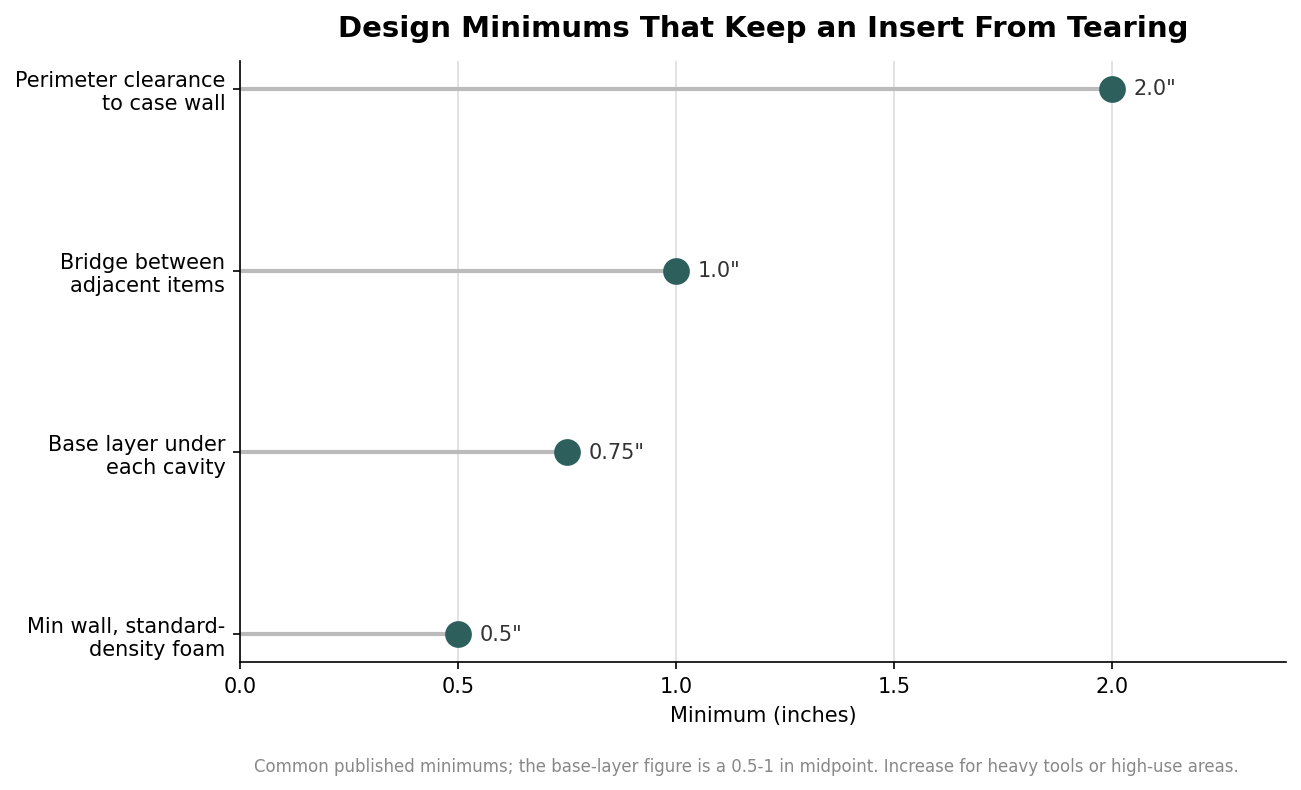
    Cavities need room around them or the foam tears. Two rules carry most of the weight. Keep a perimeter margin, on the order of 2 inches of solid foam between any cavity and the case wall, so the block does not split along an edge. And keep a bridge between adjacent pockets: roughly a 1-inch web is a common minimum, with half an inch being about the floor for standard-density foam before the wall gets too fragile to last. High-use pockets, or heavy tools that get yanked out fast, deserve thicker walls than the minimum. These numbers are not arbitrary; they are what keeps a pluck-and-drop cavity from becoming a ragged hole after a season of use. The chart summarizes the minimums to design against.

    Dot plot of custom foam insert design minimums in inches: 2 inch perimeter clearance, 1 inch bridge, 0.75 inch base layer, 0.5 inch minimum wall
    Design minimums, in inches, that keep cavity walls from tearing over time.

    One more clearance is vertical: the top foam should compress against the contents by something like 10 to 25 percent of its thickness when the case shuts, enough to hold parts still without crushing them. Aim for the low end of that range for fragile optics or electronics and the higher end for rugged hand tools.

    Choose density and access for how you will actually use it

    Foam is not one material. Closed-cell polyethylene, the usual choice for tools and heavy gear, spans a wide firmness range, with published densities running from roughly 1.2 up to about 9 pounds per cubic foot; firmer foam holds a crisp cavity edge and resists abrasion, while softer grades cradle delicate items. Ester and ether polyurethanes, cross-linked polyethylene, and specialty foams like conductive or high-temperature grades each suit narrower jobs. Decide access at the same time: finger scallops or through-holes at the ends of a pocket let a user pinch a tool out instead of prying at flush foam, and a cutout that reaches the base layer lets you push a part up from underneath. These small features are cheap to add at the design stage and nearly impossible to retrofit cleanly. A two-tone build, a bright base layer under a dark top, is another design-stage decision worth making here: when a tool is missing, the exposed color flags the empty pocket at a glance, which is why shadow-board style inserts pair so well with tool control.

    Hand off clean files and confirm the tolerance

    The last step is communicating the design so it cuts correctly the first time. A dimensioned drawing or a vector outline of each cavity, with the layer thicknesses called out, beats a photo every time; if you only have the physical parts, a good shop can trace them, but that adds time and a proofing round. Ask what cutting method the quote assumes, because it sets what is achievable: modern CNC routing typically holds a tolerance around plus or minus 0.010 inch, tight enough for a snug tool fit, while pick-and-pluck and simple die work are coarser and cheaper. Confirm the foam type and density, the finger-hole locations, and whether the price includes a base and lid layer or just the cut middle. Nail those down in writing and the insert that arrives will match the one in your head, which, after all the measuring, is the entire goal.

  • How Custom Foam Inserts Are Cut: Pick-and-Pluck, Die, CNC, and Waterjet Compared

    How Custom Foam Inserts Are Cut: Pick-and-Pluck, Die, CNC, and Waterjet Compared

    The foam is only half of a custom insert. How that foam is cut decides whether your tools drop into snug, labeled pockets or rattle around in loose approximations of the right shape. The same block of polyethylene can be turned into a rough grid you pull apart by hand or a set of cavities held to half a millimeter, and the gap between those two outcomes is the fabrication method. Choosing it well is mostly a matter of matching precision and quantity to what the job actually needs, rather than paying for tolerance you will never notice or accepting a fit that fails the first time the case is dropped.

    Here is how the four common approaches compare, what each one holds, and where each one earns its place.

    Pick-and-pluck: the grid that comes in the case

    Pick-and-pluck foam is pre-scored into a grid of small cubes, usually around half an inch, that you pull out by hand to rough out a pocket for each item. It is the foam that ships inside many stock hard cases, and its appeal is obvious: no CAD file, no lead time, and no extra cost beyond the case itself. For a one-off kit you are assembling on a bench, it is genuinely useful.

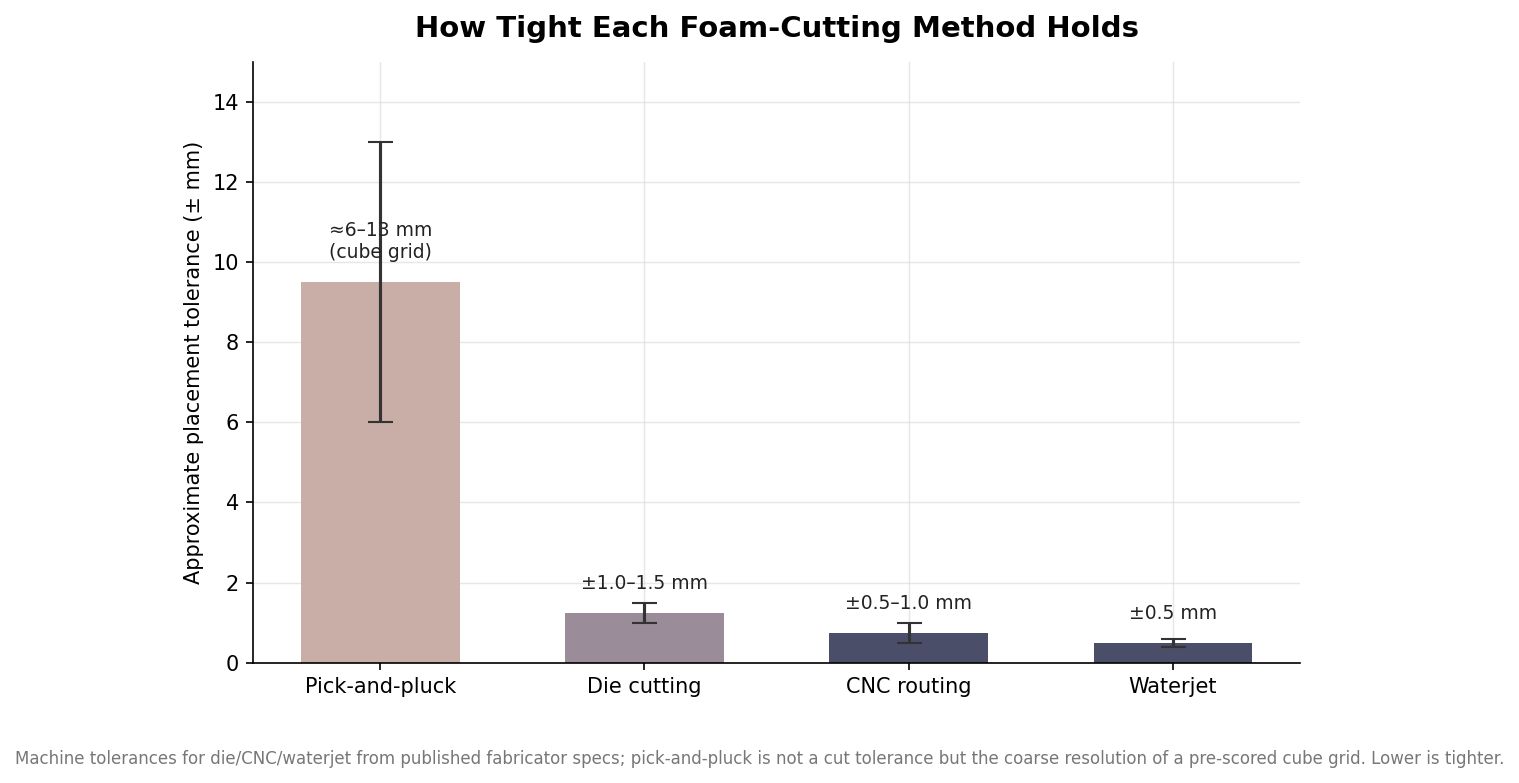
    The limits show up the moment precision matters. Because the resolution is the size of a cube, your effective placement tolerance is coarse, on the order of six to thirteen millimeters, and the plucked walls are jagged rather than clean. Every pocket edge is a column of loose cubes that can tear, shed, and gradually lose their grip on the item. For a single case that never leaves a desk drawer, fine. For a branded product you ship in volume, pick-and-pluck reads as unfinished.

    Die cutting: cheap per piece once the tooling exists

    Die cutting stamps foam with a custom steel-rule die, the same idea as a cookie cutter, and it is built for repeatability at volume. Once the die exists, each part comes off fast and cheap, holding a tolerance in the range of plus or minus one to one-and-a-half millimeters with high consistency piece to piece. That makes it the natural choice when you need hundreds or thousands of identical inserts and the shape is essentially flat.

    The catch is the die itself, which is an upfront tooling cost and a commitment. Steel-rule dies excel at cutting through a sheet in a clean two-dimensional outline, but they are poor at multi-depth cavities and complex internal contours, and changing the design means cutting a new die. Die cutting rewards you for knowing exactly what you want and needing a lot of it.

    Bar chart comparing placement tolerance of pick-and-pluck, die cutting, CNC routing, and waterjet foam cutting in millimeters
    Machine tolerance tightens sharply from hand-plucked cubes to waterjet; lower is tighter.

    CNC routing: multi-depth cavities from a CAD file

    CNC routing carves foam with a spinning bit driven by a CAD file, which lets it do the thing die cutting cannot: cut pockets to different depths in the same insert, step a cavity so a tool nests at an angle, or engrave labels directly into the foam. It holds roughly plus or minus half a millimeter to one millimeter with no tooling to pay for, so it is well suited to prototypes, short runs, and designs you expect to revise.

    Its one geometric constraint is the bit. Because a router uses a round cutter, the tightest inside corner it can produce is limited by the bit diameter, so perfectly sharp internal corners are not on the menu. Good practice also keeps at least about five millimeters of wall between adjacent pockets so the foam does not tear during cutting or in use. Design around those two rules and CNC gives you the most flexible cavity work of any method.

    Waterjet: the tightest tolerance and cleanest edge

    Waterjet cutting uses a high-pressure stream of water to slice through foam, and it produces the tightest tolerance of the group, around plus or minus half a millimeter, with a clean vertical edge and no heat or dust. Unlike a router bit, a waterjet stream is narrow enough to turn genuinely sharp internal corners, so it handles intricate outlines, thin webs, and crisp ninety-degree pockets that a CNC bit would round off. Like CNC, it needs no tooling, which keeps it economical for low-to-mid volumes and design changes.

    Waterjet is typically a through-cutting process, so it shines on precise two-dimensional profiles and stacked layers rather than the sculpted, variable-depth pockets a router produces in a single piece. Many shops combine the two, waterjetting the precise outlines and routing the depth, which is worth knowing when a design needs both sharp corners and stepped cavities.

    Choosing by precision, quantity, and budget

    Line the methods up and a simple decision emerges. If you need one insert today and rough protection, pick-and-pluck is fine. If you need a few to a few hundred with real precision and expect to iterate, CNC routing and waterjet are the digital, no-tooling options, with waterjet edging ahead on tolerance and sharp corners and CNC ahead on multi-depth pockets. If you need many hundreds or thousands of an identical, flat design, die cutting’s tooling cost amortizes into the lowest price per piece.

    The economics turn on that tooling. A steel-rule die is a fixed cost you pay once and then spread across the run, while digital methods charge no setup but more per part, so there is a break-even quantity below which digital is cheaper and above which the die wins. Where that crossover falls depends on part size, foam type, and the shop, but the shape of the trade-off is consistent, and it is the single most useful thing to reason about before you request a quote. The illustration below shows why the same insert can be the wrong choice at ten pieces and the right one at a thousand.

    Illustrative line chart of total job cost versus order quantity for steel-rule die cutting versus CNC or waterjet
    Illustrative tooling-amortization trade-off: digital wins on small runs, die cutting wins on volume.

    In practice, decide the quantity and the required tightness first, then let those two numbers point you to the method. A snug, protective, presentable insert does not require the tightest process available; it requires the process that matches the job. Send a fabricator your dimensions and, ideally, a CAD drawing for a manufacturability review, and ask which method they would route it to and why. The answer, and the tolerance and price that come with it, tells you as much about the shop as it does about the part.

  • Tool Foam Shadow Boards: The 5S Guide

    Call or Text us: (929) 605-4397

    Why tool control keeps failing

    Every shop has tried to get organized. Pegboards get repainted, drawers get labeled, someone prints a laminated map of where everything goes — and six weeks later the 10mm socket is missing again and nobody knows when it left. The problem is rarely effort. It is that most tool-control systems depend on people checking them, and busy people stop checking. A foam shadow board flips that: the system checks itself, visually, every time anyone walks past it.

    What a shadow board actually is

    A shadow board is a panel of firm, CNC-cut foam — usually dense EVA or high-density polyethylene — with a silhouette cut for every tool it holds. The top layer is one color and the layer beneath is a loud contrasting color, classically red or yellow. When a tool is in its place, you see the tool. When it is not, you see a bright tool-shaped shadow that is visible across a workshop. Etched labels under each silhouette name the tool and its position, so returning tools requires no memory and no judgment calls.

    Boards mount on walls or above benches, but the same two-tone construction works flat: drawer inserts for roller cabinets, drop-in trays for benches, and case inserts for kits that travel. The principle is identical everywhere — one home per tool, and an empty home that advertises itself.

    Where shadow boards fit in 5S

    5S — Sort, Set in Order, Shine, Standardize, Sustain — is the lean methodology most shops use to attack workplace disorganization, and shadow boards are the physical backbone of the middle three steps. But they help everywhere, so it is worth walking the full cycle.

    Sort

    Before anything is cut, you decide which tools actually belong at the station. Building a shadow board forces the conversation: every silhouette costs layout space, so duplicates, orphans, and the mystery pliers nobody owns get culled. Most teams discover a third of what lives at a bench does not belong there.

    Set in order

    This is the shadow board’s home turf. Tools are arranged by frequency of use and workflow — daily drivers at the edge, occasional tools deeper in — and the layout is locked into foam. A good layout puts the tool where the hand already goes. When we design boards, we ask for photos of the bench in real use, not the cleaned-up version, because the goal is to formalize what already works.

    Shine

    Closed-cell foam helps here more than people expect. It is non-absorbent and resists oils and shop chemicals, so the board wipes clean instead of soaking up grime. And because every tool has a pocket, cleaning the bench takes minutes — there is no pile to sort, just tools to return to obvious homes.

    Standardize

    One board is an improvement; identical boards across every bay are a system. Because inserts are CNC-cut from saved digital files, station two’s board can be a perfect copy of station one’s, and a new bay added next year matches both. Color standards carry meaning too: many facilities run red shadows for critical tools, yellow for calibration-sensitive items, and site-standard colors for everything else.

    Sustain

    Sustain is where 5S programs die, because it usually depends on audits and discipline. Shadow boards automate the audit. A supervisor glancing across the shop sees every missing tool as a bright shadow, and end-of-shift checks become a walk-past instead of an inventory count. The system nags so nobody has to.

    Designing a board your crew will actually use

    A few rules separate boards that work from boards that get ignored. Cut silhouettes from the actual tool outlines, not generic shapes, so every tool has exactly one home that fits nothing else. Add finger scoops so removal is one motion — if getting a tool out is annoying, it will end up on the bench instead of in its pocket. Etch names and position numbers, because a labeled board trains new hires without a conversation. And involve the crew in the layout: a board that mirrors how the team already works gets adopted in a day, while a board imposed from a clipboard gets fought forever.

    Getting started without a big program

    You do not need a facility-wide rollout to prove the concept. Pick the one bench or drawer that causes the most tool arguments, photograph the tools on a grid mat, and send us the dimensions. We lay out the silhouettes and send a free mockup within 24 hours, with unlimited revisions until the crew signs off. Production takes 2 weeks, with faster turnaround available with express shipping, and the minimum is just 12 inserts, so a pilot can cover a full bank of drawers or a set of benches in one order. Run it for a month, count how many tools go missing, and let the results argue for the rest of the shop. In our experience, the second order writes itself.

    GET A QUOTE
  • PE vs EVA vs XLPE: Choosing Foam for Your Insert

    Call or Text us: (929) 605-4397

    Three foams, one decision

    Nearly every custom insert we cut comes down to a choice between three closed-cell foams: polyethylene (PE), ethylene-vinyl acetate (EVA), and cross-linked polyethylene (XLPE). All three are firm, non-absorbent, and hold a crisp CNC-cut pocket for years. But they differ in density, surface feel, and finish quality, and the right choice depends on what the insert holds, where it travels, and who sees it. This guide walks through each material the way we walk customers through it on a quote call.

    Polyethylene (PE): the workhorse

    Standard closed-cell PE is the default for tool drawers, equipment cases, and most industrial inserts, and for good reason. It is firm enough to hold a heavy wrench or a survey instrument in a friction-fit pocket, resilient enough to recover from repeated compression, and resistant to water, oils, and most shop chemicals. When a case gets rained on at a job site or a drawer collects cutting fluid, PE wipes clean and keeps its shape.

    PE cuts cleanly on a CNC router, holding sharp pocket edges and finger scoops without tearing. It also layers well: a common build is a cut PE base with a thinner lid layer above it, stacked to fill the full depth of a case so nothing shifts when the lid closes. If your insert lives in a shop, a truck, or a rental fleet, PE should be your starting assumption, and you should need a reason to move away from it.

    EVA: density and grip

    EVA is the densest of the three, with a slightly rubbery surface that grips what it holds. That combination makes it the choice for shadow boards and heavy tool control: a vertical board needs pockets that hold a chisel or a dead-blow hammer against gravity, and EVA’s firmness plus surface friction does exactly that. It also shrugs off the daily abuse of gloved hands pulling tools in and out hundreds of times a week.

    The trade-off is weight and feel. EVA is noticeably heavier than PE at the same thickness, and its firmness that helps a wall board can feel unforgiving around delicate items. We rarely spec EVA for camera gear or polished goods; we almost always spec it for wall-mounted tool silhouettes, bench-top tool control, and pockets holding items heavy enough to deform softer foam over time.

    XLPE: the fine-cell finisher

    Cross-linked polyethylene is chemically bonded into a finer, more uniform cell structure than standard PE. The practical difference shows at the cut edge: where PE shows a slightly open, porous wall, XLPE cuts smooth and almost velvety. That finish is why XLPE dominates presentation work — watch trays, knife displays, influencer kits, executive gift boxes — anywhere a customer looks into the recess rather than just reaching into it.

    XLPE also takes laser etching beautifully. Logos, tool names, and position numbers etch into the surface with sharp detail, which is harder to achieve on coarser foam. And because the fine cell structure is gentler against surfaces, it is the safe pick for polished metal, coated finishes, and optics. The cost is modest but real: XLPE runs more than standard PE, so we recommend it where the finish is visible and PE where it is not.

    How the three compare in practice

    Protection

    All three are closed-cell and protective; the differences are about matching firmness to weight. Heavy items want dense EVA or high-density PE so pockets do not slowly stretch. Midweight tools and instruments are happy in standard PE. Light, delicate, or finish-critical items favor XLPE, sometimes paired with a soft polyurethane lid layer that presses gear gently into its pockets.

    Appearance

    XLPE wins on looks, full stop. If the insert is part of a product presentation or unboxing, the smooth recess walls and crisp etching justify it. PE looks clean and professional in an industrial context. EVA reads rugged, which suits a shop wall.

    Environment

    All three resist water and most chemicals, so the environmental question is really about abuse: EVA for constant handling and vertical mounting, PE for general transit and shop life, XLPE for controlled environments where finish matters.

    Common builds that mix materials

    The best inserts often combine foams. A tool drawer might use a PE top layer over a bright EVA shadow layer, so empty pockets flash a warning color. A camera case might pair an XLPE base with a convoluted polyurethane lid foam for downward pressure. A presentation box might float an XLPE tray above a PE structural base to keep cost sensible. When you request a quote, describe what the insert holds and where it goes — we will propose the stack rather than making you pick blind.

    Ordering the right foam the first time

    Whatever material you land on, the process is the same: send the interior dimensions of your drawer, case, or box along with photos, tracings, or a list of the items to hold. We lay out the pockets, recommend the foam and thickness, and send a free digital mockup within 24 hours, with unlimited revisions until the layout is right. Production runs 2 weeks, with faster turnaround available with express shipping, and our minimum is just 12 inserts — small enough for a single crew’s kit, repeatable enough for a fleet. Choose PE when in doubt, EVA when it hangs or takes a beating, and XLPE when someone important is going to look inside the box.

    GET A QUOTE