The foam is only half of a custom insert. How that foam is cut decides whether your tools drop into snug, labeled pockets or rattle around in loose approximations of the right shape. The same block of polyethylene can be turned into a rough grid you pull apart by hand or a set of cavities held to half a millimeter, and the gap between those two outcomes is the fabrication method. Choosing it well is mostly a matter of matching precision and quantity to what the job actually needs, rather than paying for tolerance you will never notice or accepting a fit that fails the first time the case is dropped.
Here is how the four common approaches compare, what each one holds, and where each one earns its place.
Pick-and-pluck: the grid that comes in the case
Pick-and-pluck foam is pre-scored into a grid of small cubes, usually around half an inch, that you pull out by hand to rough out a pocket for each item. It is the foam that ships inside many stock hard cases, and its appeal is obvious: no CAD file, no lead time, and no extra cost beyond the case itself. For a one-off kit you are assembling on a bench, it is genuinely useful.
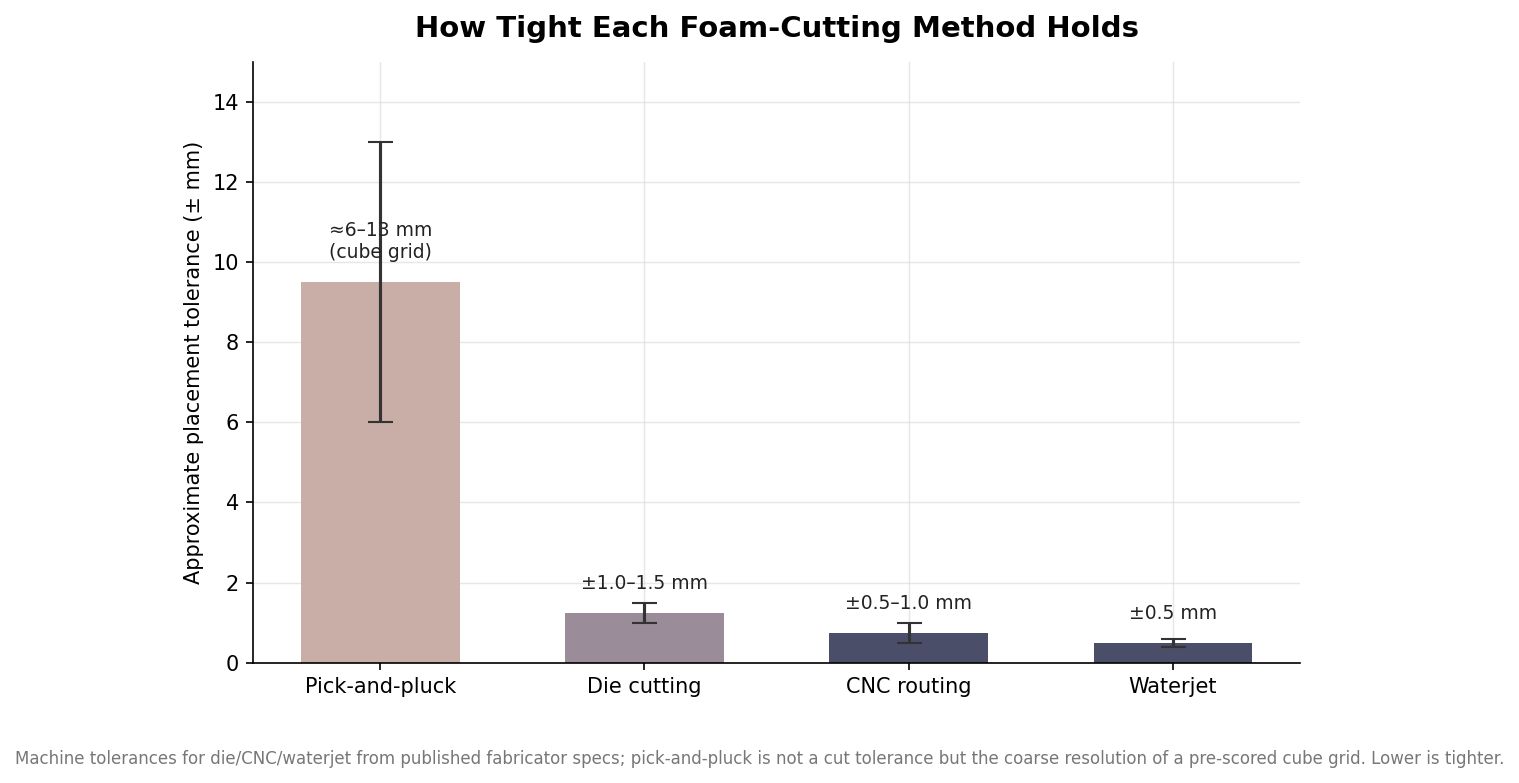
The limits show up the moment precision matters. Because the resolution is the size of a cube, your effective placement tolerance is coarse, on the order of six to thirteen millimeters, and the plucked walls are jagged rather than clean. Every pocket edge is a column of loose cubes that can tear, shed, and gradually lose their grip on the item. For a single case that never leaves a desk drawer, fine. For a branded product you ship in volume, pick-and-pluck reads as unfinished.
Die cutting: cheap per piece once the tooling exists
Die cutting stamps foam with a custom steel-rule die, the same idea as a cookie cutter, and it is built for repeatability at volume. Once the die exists, each part comes off fast and cheap, holding a tolerance in the range of plus or minus one to one-and-a-half millimeters with high consistency piece to piece. That makes it the natural choice when you need hundreds or thousands of identical inserts and the shape is essentially flat.
The catch is the die itself, which is an upfront tooling cost and a commitment. Steel-rule dies excel at cutting through a sheet in a clean two-dimensional outline, but they are poor at multi-depth cavities and complex internal contours, and changing the design means cutting a new die. Die cutting rewards you for knowing exactly what you want and needing a lot of it.
CNC routing: multi-depth cavities from a CAD file
CNC routing carves foam with a spinning bit driven by a CAD file, which lets it do the thing die cutting cannot: cut pockets to different depths in the same insert, step a cavity so a tool nests at an angle, or engrave labels directly into the foam. It holds roughly plus or minus half a millimeter to one millimeter with no tooling to pay for, so it is well suited to prototypes, short runs, and designs you expect to revise.
Its one geometric constraint is the bit. Because a router uses a round cutter, the tightest inside corner it can produce is limited by the bit diameter, so perfectly sharp internal corners are not on the menu. Good practice also keeps at least about five millimeters of wall between adjacent pockets so the foam does not tear during cutting or in use. Design around those two rules and CNC gives you the most flexible cavity work of any method.
Waterjet: the tightest tolerance and cleanest edge
Waterjet cutting uses a high-pressure stream of water to slice through foam, and it produces the tightest tolerance of the group, around plus or minus half a millimeter, with a clean vertical edge and no heat or dust. Unlike a router bit, a waterjet stream is narrow enough to turn genuinely sharp internal corners, so it handles intricate outlines, thin webs, and crisp ninety-degree pockets that a CNC bit would round off. Like CNC, it needs no tooling, which keeps it economical for low-to-mid volumes and design changes.
Waterjet is typically a through-cutting process, so it shines on precise two-dimensional profiles and stacked layers rather than the sculpted, variable-depth pockets a router produces in a single piece. Many shops combine the two, waterjetting the precise outlines and routing the depth, which is worth knowing when a design needs both sharp corners and stepped cavities.
Choosing by precision, quantity, and budget
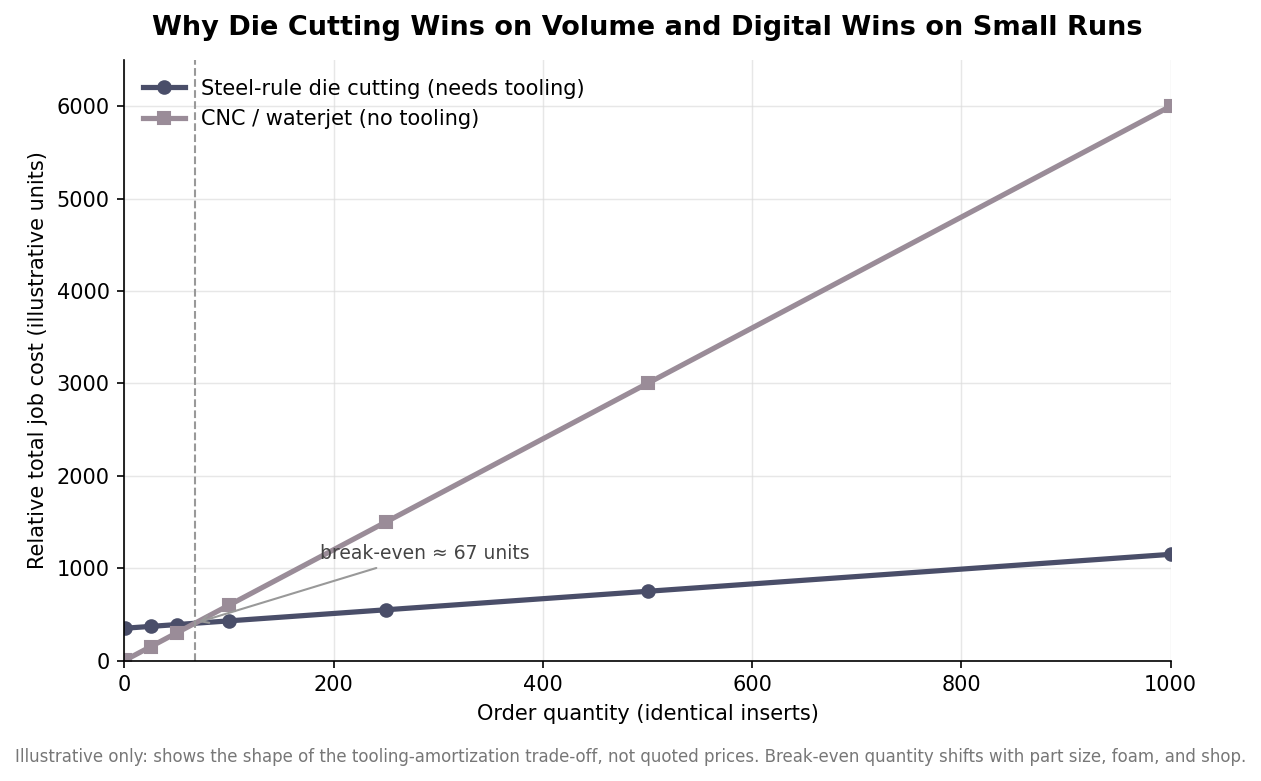
Line the methods up and a simple decision emerges. If you need one insert today and rough protection, pick-and-pluck is fine. If you need a few to a few hundred with real precision and expect to iterate, CNC routing and waterjet are the digital, no-tooling options, with waterjet edging ahead on tolerance and sharp corners and CNC ahead on multi-depth pockets. If you need many hundreds or thousands of an identical, flat design, die cutting’s tooling cost amortizes into the lowest price per piece.
The economics turn on that tooling. A steel-rule die is a fixed cost you pay once and then spread across the run, while digital methods charge no setup but more per part, so there is a break-even quantity below which digital is cheaper and above which the die wins. Where that crossover falls depends on part size, foam type, and the shop, but the shape of the trade-off is consistent, and it is the single most useful thing to reason about before you request a quote. The illustration below shows why the same insert can be the wrong choice at ten pieces and the right one at a thousand.
In practice, decide the quantity and the required tightness first, then let those two numbers point you to the method. A snug, protective, presentable insert does not require the tightest process available; it requires the process that matches the job. Send a fabricator your dimensions and, ideally, a CAD drawing for a manufacturability review, and ask which method they would route it to and why. The answer, and the tolerance and price that come with it, tells you as much about the shop as it does about the part.
Leave a Reply