A custom foam insert lives or dies on measurement. Cut it a few millimeters too tight and the tools will not seat; cut it loose and everything rattles, which defeats the point. The good news is that specifying an insert that drops into your case and holds its contents for years is a repeatable process, not a guess. This walkthrough goes step by step from measuring the empty case to handing a clean drawing to whoever cuts the foam, with the clearances and tolerances that separate a professional fit from a sloppy one.
Start with the case, not the tools
Every insert is sized to the case first. Measure the internal dimensions, length, width, and usable depth, at the bottom of the case where the foam actually rests, not at the rim, because molded cases taper and the lip is almost always wider than the floor. Usable depth is the measurement people get wrong most often: measure from the floor to the sealing line, and if the lid has its own ribs or a gasket channel, subtract the space those need so the case still latches. Record everything to the sixteenth of an inch or the millimeter. If you are fitting a known case such as a Pelican or Nanuk, the manufacturer publishes internal dimensions, but confirm with calipers anyway, since tooling and revisions drift. Note too whether anything needs to ride in the lid, because a lid foam layer eats into the closing clearance and has to be planned as part of the same budget rather than added as an afterthought.
Plan your layers before you plan the cavities
Most quality inserts are a stack, not a single block, and deciding the stack-up early keeps you from over-cutting. A typical build is a base layer of 0.5 to 1 inch of firm closed-cell foam that stays solid across the whole footprint, a middle layer where the cavities are cut, and often a thin lid or convoluted top layer that presses down on the contents when the case closes. The base does two jobs: it cushions the bottoms of your tools and it leaves foam under every pocket so nothing bottoms out against the hard case. The figure below shows how a shallow tray and a deeper gear case each divide their total depth among those layers.
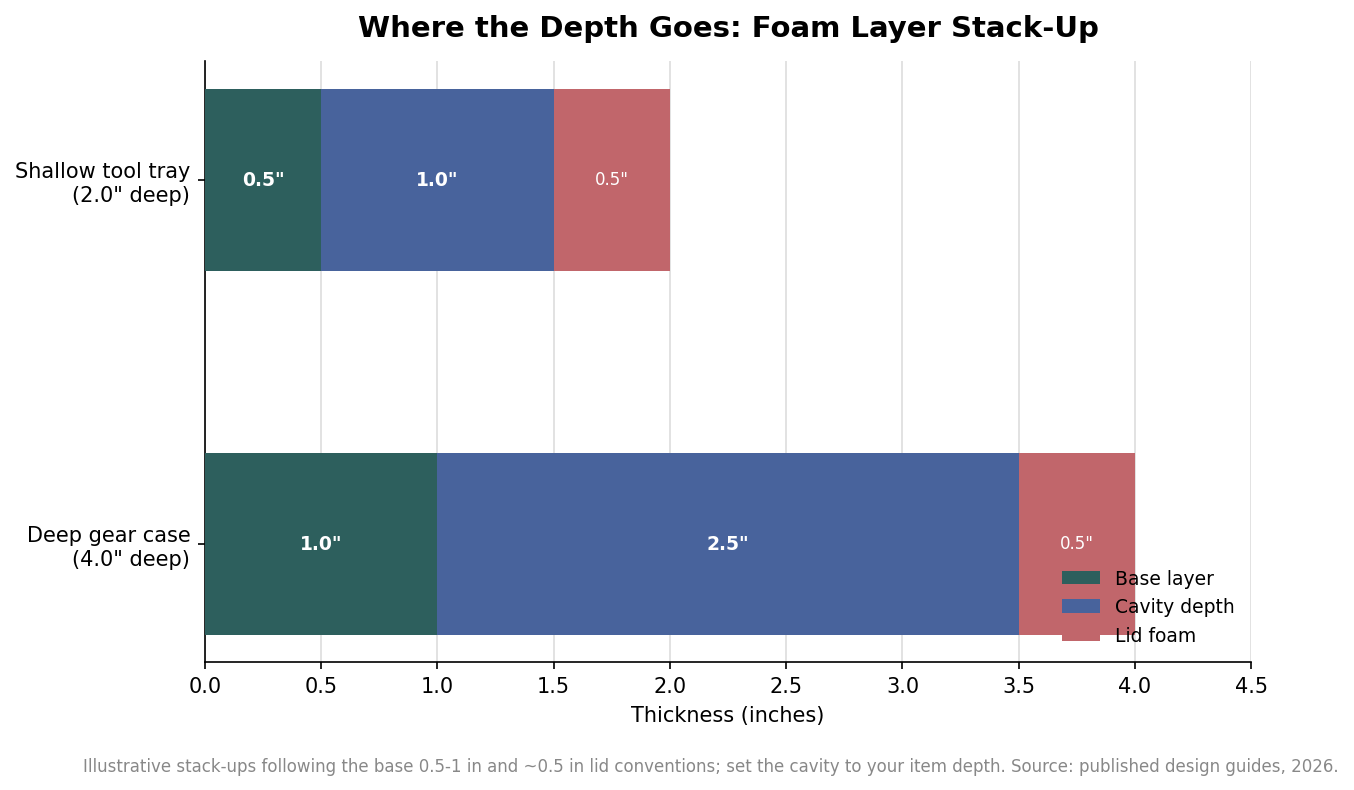
Working from the stack down means you decide cavity depth by subtracting the base and lid from the usable depth, rather than discovering at the end that your pockets are cut through to the plastic.
Set clearances and wall thickness so the foam survives
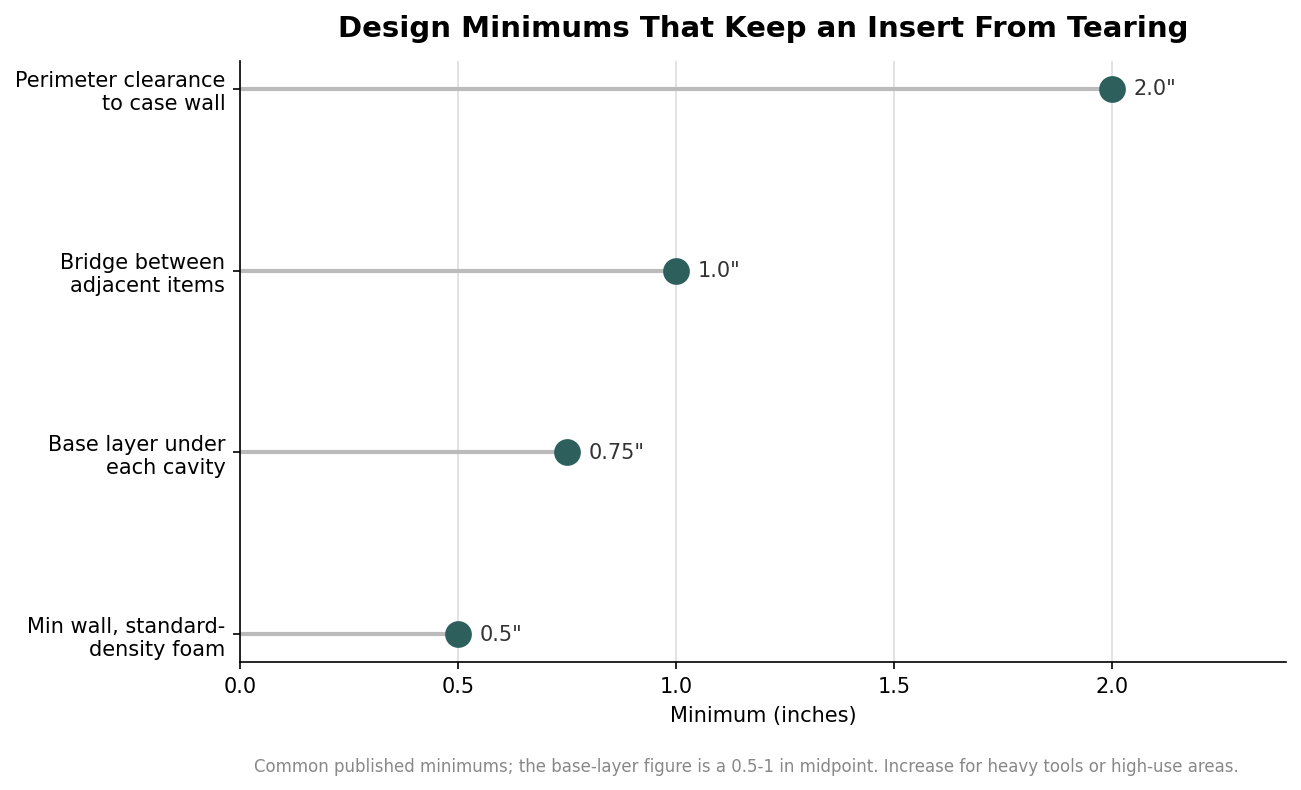
Cavities need room around them or the foam tears. Two rules carry most of the weight. Keep a perimeter margin, on the order of 2 inches of solid foam between any cavity and the case wall, so the block does not split along an edge. And keep a bridge between adjacent pockets: roughly a 1-inch web is a common minimum, with half an inch being about the floor for standard-density foam before the wall gets too fragile to last. High-use pockets, or heavy tools that get yanked out fast, deserve thicker walls than the minimum. These numbers are not arbitrary; they are what keeps a pluck-and-drop cavity from becoming a ragged hole after a season of use. The chart summarizes the minimums to design against.
One more clearance is vertical: the top foam should compress against the contents by something like 10 to 25 percent of its thickness when the case shuts, enough to hold parts still without crushing them. Aim for the low end of that range for fragile optics or electronics and the higher end for rugged hand tools.
Choose density and access for how you will actually use it
Foam is not one material. Closed-cell polyethylene, the usual choice for tools and heavy gear, spans a wide firmness range, with published densities running from roughly 1.2 up to about 9 pounds per cubic foot; firmer foam holds a crisp cavity edge and resists abrasion, while softer grades cradle delicate items. Ester and ether polyurethanes, cross-linked polyethylene, and specialty foams like conductive or high-temperature grades each suit narrower jobs. Decide access at the same time: finger scallops or through-holes at the ends of a pocket let a user pinch a tool out instead of prying at flush foam, and a cutout that reaches the base layer lets you push a part up from underneath. These small features are cheap to add at the design stage and nearly impossible to retrofit cleanly. A two-tone build, a bright base layer under a dark top, is another design-stage decision worth making here: when a tool is missing, the exposed color flags the empty pocket at a glance, which is why shadow-board style inserts pair so well with tool control.
Hand off clean files and confirm the tolerance
The last step is communicating the design so it cuts correctly the first time. A dimensioned drawing or a vector outline of each cavity, with the layer thicknesses called out, beats a photo every time; if you only have the physical parts, a good shop can trace them, but that adds time and a proofing round. Ask what cutting method the quote assumes, because it sets what is achievable: modern CNC routing typically holds a tolerance around plus or minus 0.010 inch, tight enough for a snug tool fit, while pick-and-pluck and simple die work are coarser and cheaper. Confirm the foam type and density, the finger-hole locations, and whether the price includes a base and lid layer or just the cut middle. Nail those down in writing and the insert that arrives will match the one in your head, which, after all the measuring, is the entire goal.
Leave a Reply